Showing posts with label Daemon Prince. Show all posts

BIG Daemon Prince WiP: pt 3

Here are a few more pics of the big beast!


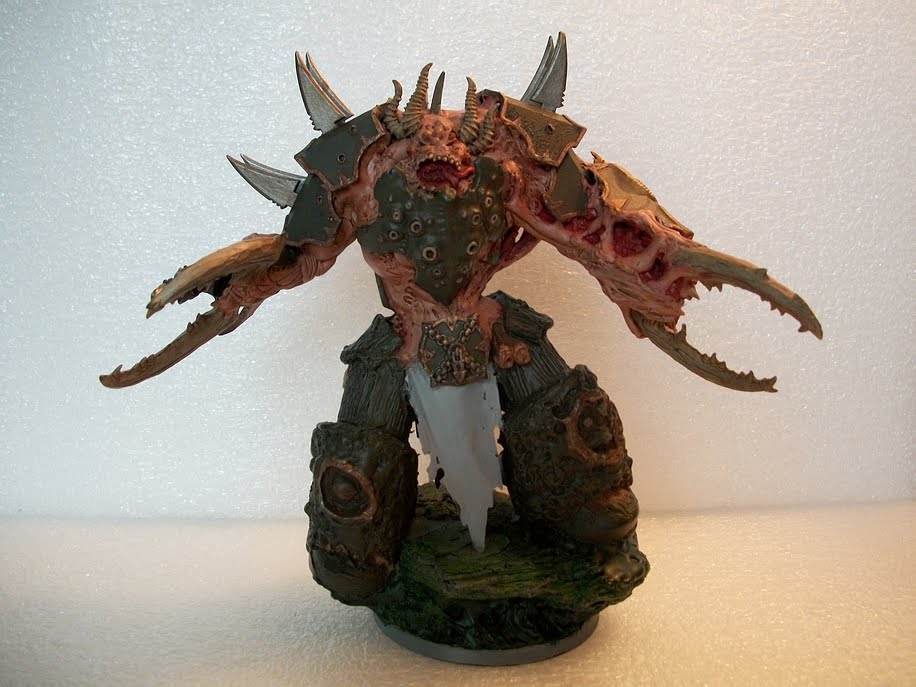
I put a generous amount of Scorched Earth on the darker green areas of the armor. The spikes on the shoulder were also dry brushed with the same color.


I went over the skin with a little bit of bealched Bone followed by Desert Yellow. This gave it a little more of a diseased look. Once that dried I mixed 2:1 Gloss Medium with Scorpion Green and went over the skin and armor.


Once everything dried again I added a little skull white to the mix to lighten up the green areas. You can see this on the tips of the claw above.


The shoulder armor was dotted with the 2:1 mix a few coats. I then went over the hard lines with the lighter 4:2:1 (Gloss Medium:Scorpion Green:Skull White)

Aside from the wings, all that's left is the base and lower legs. The banner hanging down I decided to paint as rotting flesh instead of cloth. I think blending it from the current skin tones to a dark brown would draw attention to it and off set a lot of the green a little.

The base itself I might change to lava. originally I was going to make it look like toxic waste, but now having more green might drown the model out too much. The lava might be a nice offset the other colors.

BIG Daemon Prince WiP: pt 2

Primed
_____________________________

Here's a size comparison next to the Blood Thirster. As you can see he's HUGE lol. I plan on using him as an Apocalypse HQ in the future, but for now he'll fill the role of Daemon Prince

The Daemon Prince stands a little over 6 inches w/o wings and about 11 inches with them on. So much for hiding out of Line of Sight, lol.

Basecoats
_____________________________

The skin I used GW Tallarn Flesh foundation, the red areas are Mechrite Red foundation, Catachan on the green spots, and Kommando Khaki on the bone and claw areas.

The gold areas started out with a few coats of burnished Gold. I put on a few thin coats to get it to cover evenly. Normally I'd undercoat it with a brown or similar color, but it's not too important since most of it will be covered up.

Washed
_____________________________

The skin I washed with Ogryn Flesh. Once that started to dry I applied Baal red over the exposed red areas, letting a little run over onto the skin to make it blend a little.

The rest of the model I washed with good ol' Devlin mud. The "ooze" on the base was given a light coat of Dark Angels Green which bled onto the rock (bark area) which was based Codex Grey. Once that dried I did over the base and metal areas again with Devlin Mud.

Detailing
_____________________________

I started out by dabbing boltgun metal on all the golden areas. Once that dried I applied a thin amount of Scorched Earth on all the metal areas to give it a more tarnished look.

Scorched Earth was also applied on the edges where the torn flesh areas meet. This gives the illusion of blood clotting.

The chaos piece on his back armor plate shows how the tarnished look is turning out. The brown really adds a nice muted tone to the metal making it look worn down.

Right now he looks far too healthy to be an engine of pestilence and decay. Since he is a Nurgle Daemon Prince, he will soon get a nasty skin overhaul. All the skin areas will get a light green and yellow tint using glazes. The claws I plan to have bright green tips to represent noxious touch.

The tabbard hanging down, originally, was going to be painted a whitish/yellow color with the death guard symbol. I later decided I'm going to paint it flash colors as well, but have it blend to the tip to look more like dead skin. The Nurgle symbol I will try to make it look like it's been stitched on.

BIG Daemon Prince WiP: pt 1

Work continued on the Daemon Prince. The hardest part was going to be designing the legs. Originally I thought of making hooves or a snake like lower body, but that seems to be used too often with daemons. After reading through a post on From the Warp: Making Plasticard Plates that gave me the idea of making terminator legs instead.

After some sketches and browsing through some pics I thought I'd give it a shot. The most time consuming part was making the shape of the boots fit with the body. A few times it looked like he was wearing leg warmers. Yeah nothing says "intimidation" like leg warmers.


I decided to make the Daemon Prince's look more like termie legs. Originally I was thinking of Hooves, but almost all the tuorials I saw had the same style of legs so I wanted to be different.


After sculpting the boots (which remind me an awful lot like Mega Man's lol) I stretched a thin amount of GS over the thigh areas.


I followed the same process over the boot area. This will help bond the glue to the plasticard better.

The reason I made him so big is because he is a Heavy choices in the Chaos Daemon codex, unlike the Chaos Space Marine's counterpart being an HQ instead


While that cured I got to work on the shin armor plates. I had some 3x5 cards lying around and made a template. Let's see how it fits....


As you can see it's a little too big. It almost looks like he's wearing soccer shin guards, lol. Nothing a pair of scissors can't fix.


After cutting the stencil down a bit I traced the image onto a sheet of plasticard.


The upper leg plating was a bit easier. All that had to be done was cut a strip of plastic card and bind it to help with the bend.


I started the process by gluing the inner part and holding in shape for a few minutes.


After 15 minutes I glued the rest in place around the leg.


The shin plates were glued in the middle then folded back. After this comes my favorite part; playing with the hot glue again. The hot glue gun is great for making quick drying texture. Although it doesn't hold shape like clay does, it can be heated and re-sculpted easily so it's very effective for this sort of thing.

CutCleanGluePrimePaintRepeat

Here's a few quick updates on what I've been working on recently. After a week or so I'll be taking a break from my army to focus on another commision for a friend. I haven't done one since The Eldar Avatar and Yarrick so it will be fun. :D


Added some detail to the Blood Thirster. I was trying some inking a little on his horns.


He needs work on the wings then final clean up and detailing. I'm looking forward to getting this one all done.


While waiting for the Blood Thirster to dry I go back to this guy and refine the details a little. I like his theme so far especially the definition on the torso.


A better view of the ribcage and highlighted foot. The biggest challenge will be the wings. I want them to look different than the other models to accentuate his uniqueness (as he is a named character). I'm thinking of a bat-leather type texture.


I've also been touching up the (remaining) Ultramarines. This Captain I started working on his banner. If I get the time I would like to paint the rest of my marines. The ten that I haven't sold I'm thinking of painting one from each of the major chapters like Space Wolves, Crimson Fist, Dark Angels, Blood Angels, etc..

Be'Lakor: 2 Primed and Washed


Here he is with the krylon satin burgundy base coat and a quick wash of Devlin Mud.

Be'Lakor: 1 Assembled


Be'Lakor, the Dark Master (aka my Daemon Prince) assembled and ready for a base coat. I'm going to do the Krylon Burgandy again since it worked pretty good on the other models.