Showing posts with label Green Stuff. Show all posts

Low Standards!

Hey everybody!

I apologize for the long over-due post. My stupid pc decided to retire early which made blogging difficult. Most of my photos are still stuck on my hard drive so for the time being I'm posting what was still on my camera. Hey, it's a start right?


Speaking of starts (terrible segway I know) this was an old fantasy model I picked up a while ago from my FLGS. I thought the pose would make for a good standard bearer. Still debating on leaving the chain-mail loin cloth as-is or greenstuff in the lower half of a jacket. I fear that doing the latter may make him look pantless like one of the chipmunks. Then again he is Chaos so anything goes, right?

EDIT: Oh yeah I'd like to apologize for the cat hair in the first pick. My kitty is a master at projecting hair onto things.


More updates to follow  :)


Scratch built Blight Drone I

For the upcoming campaign I wanted to try something new so I decided to try my hand at scratch building a Blight drone. This model is a based off of the Forge Model normally used for Apocalypse games (in greater numbers of course). Looking through a lot of Death Guard and all Nurgle lists and noticed a lot of people fielding these.

This model was built based off a few different tutorials. The one I found most helpful was at the Papa Nurgle forums. He really does a nice job of modeling and explaining the steps. If you're interested in making one of these please check his tutorial as it's pretty detailed :)

Every model I build I try to use the cheapest or common materials I can find.

Tools used:
  • Tin Foil
  • 12 gauge planting wire
  • Hobby knife
  • clay sculpting tools
  • never dry modeling clay
  • air dry modeling clay
  • green stuff epoxy
  • Plastic card
  • 3/8" solid rod
  • Hot glue gun
  • Soldering iron
  • and anything else laying around :)
Total material cost: about $15. Not bad considering the plastic card and green stuff would be the majority cost. They could be replaced with cheaper alternatives, but I suppose it's opportunity cost at that point; spend a little more for better quality materials and save time in the long run. Still, $15 is decent considering the original FW model costs over five times that amount.

I was lazy this time, so I didn't take pictures of the process, but for the most part it's identical to the tutorial up to the assembly point. The only big difference is I twisted 12 gauge wire to make the ties and such.


The problem with this model is all the modeling clay was making it tough to keep it mounted. The cheap clay I used underneath was too soft to glue the rod to and the GS had to much flex to keep the model in place.

The solution was to break out the soldering iron and melt some plastic to the model. It cools fast and creates a rock solid surface to work with. I melted plastic up the base to the bodem of the Blight Drone. After that I used hot glue to texture the model and tie everything together (and more importantly hide mistakes lol).


I used a black primer then gave it a light amount of brown followed by a dark green over that.


I started adding boltgun to the metal areas like the cables and gun components and Goblin Green to the slime areas.

I'm satisfied for the results, especially since it was finished before the Campaign. The hardest thing about this model was getting the cheap air-dry clay to stay in place so I could tie in the GS over it. It worked out, but if I were to make another one of these I would probably try a better alternative.

It may not look like it, but there was very little GS used. I stretched it out as much as possible to cover just the top layer and add a stronger surface to detail. To put it in perspective, I could use a full $15 tube of Green Stuff to make three of these and still have some left. That's not bad considering that these models are $75 a piece from Forge World!

Nurgle: Plague Grinder

Working on a wireframe of the PlagueGrinder. Currently he's atop a regular Soul Grinder's framework, but once this guy is done I'll start on his chassis. It will have larger back legs with smaller front ones (indicating his huge girth).

This model (torso) will also sit on a separate 60mm base to work as a Great Unclean One as well.


The Nurgle Plague Grinder faces an Ultra Marines Captain


Size Comparison; The PB is about the same height as a normal SG.


RUN AWAY! RUN AWAY!


The Ultra Marines launch a counter attack

Bloodthirster: GS gap filling and Texturing

The Bloodthirster is primed and ready to go. You can see what a difference Green Stuff adds to the model. To get this effect I gradually worked the GS into the groves and textured using a wire brush. Simple, but very effective.


The Green Stuff will also help support the wings.


After priming you can't tell any work had been to it. That's the best effect!

Bloodthirster base WIP

Another quick update. Here's a few pics of the base so far for the Bloodthirster. The theme for this one will be a mix between lava/magna and burning skulls.

Step One: I mixed some drywall gap filler and a few small rocks together and worked it onto the base.


Step Two: As it started to cure I began shaping it some more. Although it says wait 24 hours to fully cure, you can usually get good results within a few hours.


Step Three: A quick fit. I pressed the BT into place to get an idea of the foot print. So far so good! Since he's such a heavy model he'll probably need to be pinned (but I'll do that later lol)


For good measure I filled the gaps on the back of the wings. Even after cleaning and fitting the wings in better they we're still very unstable.


Nurgle Great Unclean One

Working a little more on the Nurgle Great Unclean one/Plague Grinder. The first few pics show the work to the horns. I started with a piece of green stuff about the size of a pea and rolled it out about the width of a pencil and twice the length of the horn. I let it cure for about 15 minutes, then wound it from the skull to the tip of the horn. From there I began to manipulate the shape more to my liking.


Also added a nice big, disgusting sore to his forehead lol.


From here I'm going to clean up the face a little more then start on the framwork of the upper body.

Ratling Sniper and some Green Stuff

I've been working a lot of 12 hour shifts so haven't had much time to devote to painting :( I'll be glad to be off call Friday to get back to living a normal life again (normal for me lol).

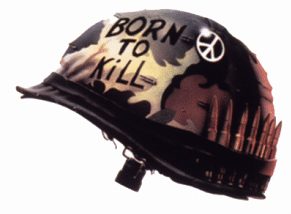
Here's a few pics of a Ratling Sniper I've been modding. I'm planning to add a "Y" branch on the tree under the gun to make it look like he's using it as a Bi-Pod. I had some extra Green stuff and decided to give him a gnomish hat lol. It's missing something though... I think some ammo and the "Born to Kill" slogan like the helmet in Full Metal Jacket.


What do you think of it so far? Have anything to add to it?

Tech Priest I: Basing and Priming

Here's my work so far on my friend's Tech Priest. I'm hoping, work permitting, to have him painted by this weekend.

I learned from my first few Pewter models to wash them before you prime them, lol. They have some sort of residue on them that makes it hard to paint.


The Servo arm on his back was not cooperating, lol. It sits on a ball joint that's not sized very well. Oh well, a little green stuff can fix that :)


Primed and ready to paint. I removed some excess green stuff from the Servo arm and changed the base a little bit. Looking forward to painting it

Avatar I - Basing and Priming

Working on the Eldar Avatar. I had to put it on hold since I wanted to re-prime the model. I noticed some areas of the base coat were chipping off as I was painting and decided to start over. While the model was in the dip tank I decided on adding a green stuff lava base to it, rather than the normal glue-n-sand method. I'm pleased with the results so far. It's subtle, but won't distract from the model like some bases I've seen. Check it out!


- - - Avatar of Khaine - - -


- - -Basing - - -

While the green stuff is still soft I added a few grooves to it. It is much easier to sculpt with the surface and tools wet.


After an hour I went back and started molding some detail to the base. I added some textures to the surface areas to help with highlighting later.


Primed and ready to paint


The next step is to start the lava flow between the armor and similar effects. I'm looking forward to finishing the base. Going to try a new tchnique for lava. More pics to follow in the next few days.