Showing posts with label Chaos Daemons. Show all posts

Too many mouths to feed!

Ah yes, who doesn't love Flamers of Tzeentch? Probably your opponent, lol.

For the points they can be quite devastating. They glance and wound on a 4+ (which really hurts MEQ armies). Thanks to the Deep Strike rule you can drop them in for a suicidal strike, or if you prefer hide them somewhere safe and rely on their jump ability and 4+ invulnerable save. They give the Daemons a much needed anti-tank punch.

You might ask "How many should I run, though?" The answer is simple; groups of three are very effective. The reason is flamers can't get any more than three templates off (Breathe of Chaos) on their first round of shooting. I suppose you could run more units, with one having Bolt of Tzeentch (30 points Range 24" Str 8 Ap1), though for the point cost I don't think it's worth it.

When Deep Striking you place the first unit (assuming they didn't mishap) then the second and third starting in a circle in the next row. That means the unit's bases are all touching one another. Adding a fourth model doesn't allow you to fire one of the templates without wounding your own units, which makes them less useful as a suicide unit. Granted, you can always run up to twelve, but if you want that many you may as well run a few squads of three instead. You'll get better results having more squads if you plan to drop them in as suicide units.


I got a good deal recently on a three pack of Flamers. It'll be nice to have the extra models (as I don't trust the pewter to stay together).


A couple coats of Flat White and they're ready for base coating. after a little touch up (I like to add a few watered down skull white layers to help reinforce the base coat) I'll start by adding a few coats of blue ink.

Once the wash dries I paint the flame areas with Iyanden Darksun base coat. It works great if you want to start a solid coat for yellow areas or in this case painting a flame. My only complaint about GW base paints is that they are pretty thick, so much so it's almost like painting with glue lol. I heard this is because they have such a high pigment (oink, jk). Still, a little water is all you need to keep it nice and smooth.

NEW! Blood Crushers

After a recent trip to my local FLGS I picked up the new Blood Crushers box. They allow you to trade in good condition books for store credit. Luckily for me I had a few nice books laying around collecting dust, lol.

The new Blood Crushers are fantastic. Not only are they all plastic (woot!) but there are also some extra bits to customize them how you like. Very niiice!

Aside from being plastic, the models fit together very nicely. My biggest complaint for the old models was that the riders kept falling off. The new models, however, fit together in multiple places. This really helps keep them together. Also, plastic fuses together with super glue so you don't have to worry about them falling apart with normal wear and tear.

In the box you have the option of five different Blood Letter (rider) and Juggernaught (mount) heads. They also supply you with five round bases and square ones too.

The riders also have the option of wielding the standard Hellblade or a variety of other weapons. I decided on equipping them with the Icon of Chaos, The Herald's war gear, and a standard Hellblade.

I didn't use the Instrument of Chaos since I never play it. This upgrade allows you to win assaults resulting in a draw. In my experience with these guys they either win or lose in assault by no small margin making the instrument not worth the points.


The above pic you can see it overhanging the base quite a bit. It may hinder base to base contact somewhat, but hey it looks cool :P


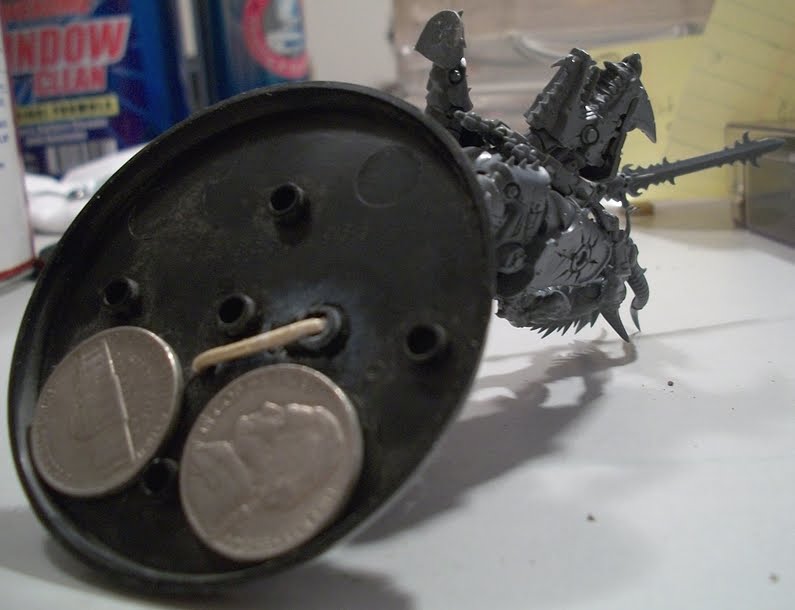
This model needed a little pinning to keep it in place. After drilling the pilot holes I took a small piece of bronze rod and formed a "u" joint. A few nickels were then added to for counter balance.


Now I'm off to base them. More pics coming soon :)


New Daemons in August? Time to save!

Sunday night, about 1130pm, I recieved a nice surprise! I was winding down doing the normal winding down stuff like drinking Red Bull and doing push-ups when I decided to check my mail. Games Workshop sent out a news letter stating "Demons in August, give us all your money!" Who am I to refuse such a profound statement? New Chaos Daemons coming in August? I guess I'll push back my Warstore order.


My Blood Crushers are primed and ready for painting. I only have the three so far, but I'll have to put off getting any more until GW reveals what the new models are. Plastic Blood Crushers would be amazing, but I doubt it. Rumors say a plastic Daemon Prince and troop choices are coming. Meh, who can say what comes out, but if they do put out any pewter replacements I'd be happy. Once they release the models I'll have to put in my order which will probably complete the Daemons army (lol yeah right).

BIG Daemon Prince WiP: pt 3

Here are a few more pics of the big beast!


I put a generous amount of Scorched Earth on the darker green areas of the armor. The spikes on the shoulder were also dry brushed with the same color.


I went over the skin with a little bit of bealched Bone followed by Desert Yellow. This gave it a little more of a diseased look. Once that dried I mixed 2:1 Gloss Medium with Scorpion Green and went over the skin and armor.


Once everything dried again I added a little skull white to the mix to lighten up the green areas. You can see this on the tips of the claw above.


The shoulder armor was dotted with the 2:1 mix a few coats. I then went over the hard lines with the lighter 4:2:1 (Gloss Medium:Scorpion Green:Skull White)

Aside from the wings, all that's left is the base and lower legs. The banner hanging down I decided to paint as rotting flesh instead of cloth. I think blending it from the current skin tones to a dark brown would draw attention to it and off set a lot of the green a little.

The base itself I might change to lava. originally I was going to make it look like toxic waste, but now having more green might drown the model out too much. The lava might be a nice offset the other colors.

BIG Daemon Prince WiP: pt 1

Work continued on the Daemon Prince. The hardest part was going to be designing the legs. Originally I thought of making hooves or a snake like lower body, but that seems to be used too often with daemons. After reading through a post on From the Warp: Making Plasticard Plates that gave me the idea of making terminator legs instead.

After some sketches and browsing through some pics I thought I'd give it a shot. The most time consuming part was making the shape of the boots fit with the body. A few times it looked like he was wearing leg warmers. Yeah nothing says "intimidation" like leg warmers.


I decided to make the Daemon Prince's look more like termie legs. Originally I was thinking of Hooves, but almost all the tuorials I saw had the same style of legs so I wanted to be different.


After sculpting the boots (which remind me an awful lot like Mega Man's lol) I stretched a thin amount of GS over the thigh areas.


I followed the same process over the boot area. This will help bond the glue to the plasticard better.

The reason I made him so big is because he is a Heavy choices in the Chaos Daemon codex, unlike the Chaos Space Marine's counterpart being an HQ instead


While that cured I got to work on the shin armor plates. I had some 3x5 cards lying around and made a template. Let's see how it fits....


As you can see it's a little too big. It almost looks like he's wearing soccer shin guards, lol. Nothing a pair of scissors can't fix.


After cutting the stencil down a bit I traced the image onto a sheet of plasticard.


The upper leg plating was a bit easier. All that had to be done was cut a strip of plastic card and bind it to help with the bend.


I started the process by gluing the inner part and holding in shape for a few minutes.


After 15 minutes I glued the rest in place around the leg.


The shin plates were glued in the middle then folded back. After this comes my favorite part; playing with the hot glue again. The hot glue gun is great for making quick drying texture. Although it doesn't hold shape like clay does, it can be heated and re-sculpted easily so it's very effective for this sort of thing.

Scratch built Blight Drone I

For the upcoming campaign I wanted to try something new so I decided to try my hand at scratch building a Blight drone. This model is a based off of the Forge Model normally used for Apocalypse games (in greater numbers of course). Looking through a lot of Death Guard and all Nurgle lists and noticed a lot of people fielding these.

This model was built based off a few different tutorials. The one I found most helpful was at the Papa Nurgle forums. He really does a nice job of modeling and explaining the steps. If you're interested in making one of these please check his tutorial as it's pretty detailed :)

Every model I build I try to use the cheapest or common materials I can find.

Tools used:
  • Tin Foil
  • 12 gauge planting wire
  • Hobby knife
  • clay sculpting tools
  • never dry modeling clay
  • air dry modeling clay
  • green stuff epoxy
  • Plastic card
  • 3/8" solid rod
  • Hot glue gun
  • Soldering iron
  • and anything else laying around :)
Total material cost: about $15. Not bad considering the plastic card and green stuff would be the majority cost. They could be replaced with cheaper alternatives, but I suppose it's opportunity cost at that point; spend a little more for better quality materials and save time in the long run. Still, $15 is decent considering the original FW model costs over five times that amount.

I was lazy this time, so I didn't take pictures of the process, but for the most part it's identical to the tutorial up to the assembly point. The only big difference is I twisted 12 gauge wire to make the ties and such.


The problem with this model is all the modeling clay was making it tough to keep it mounted. The cheap clay I used underneath was too soft to glue the rod to and the GS had to much flex to keep the model in place.

The solution was to break out the soldering iron and melt some plastic to the model. It cools fast and creates a rock solid surface to work with. I melted plastic up the base to the bodem of the Blight Drone. After that I used hot glue to texture the model and tie everything together (and more importantly hide mistakes lol).


I used a black primer then gave it a light amount of brown followed by a dark green over that.


I started adding boltgun to the metal areas like the cables and gun components and Goblin Green to the slime areas.

I'm satisfied for the results, especially since it was finished before the Campaign. The hardest thing about this model was getting the cheap air-dry clay to stay in place so I could tie in the GS over it. It worked out, but if I were to make another one of these I would probably try a better alternative.

It may not look like it, but there was very little GS used. I stretched it out as much as possible to cover just the top layer and add a stronger surface to detail. To put it in perspective, I could use a full $15 tube of Green Stuff to make three of these and still have some left. That's not bad considering that these models are $75 a piece from Forge World!

Escalation list for Week 1


My lists for the upcoming Escalation campaign. I decided to drop Khorne and go all Nurgle instead.

500 points
8 Plague Bearers +Icon = 145 pts
7 Plague Bearers = 105 pts
9 Nurglings = 117 pts
1 Blight Drone 12F 11S 10R = 125pts
Total: 492 points

750 points

Epidemus = 110
8 Plague Bearers +Chaos Icon = 145 pts
7 Plague Bearers = 105 pts
9 Nurglings = 117 pts
1 Blight Drone 12F 11S 10R = 125pts
Daemon Prince: MoN, IH, CoF = 145
Total: 747 points

I had to drop Daemonic Gaze from the Daemon Prince. It was between that or Iron Hide, but the 3+ save is too good to pass up imo.

These lists aren't very powerful, but the following week I can start beefing up the DP a little more and add another HQ. We're playing to 1500 so I'm hoping in the later weeks to fully unleash the power of Nurgle, mwa ha ha.

Scratch built DP WiP

Recently my buddy over at WH40k by S2ua7 gave me some IG and Nid bits to play with. WooT! I was going to use them as accessories for my other Soul Grinder, but then I came up with this idea.

I need another Daemon Prince and at $35 each (pewter too) it's a little steep. This one started to come together over the course of a few hours.


The head is from the GUO kit, horns from KoS alt head, and other than the chest armor, most of the model is kit bashed from a Soul Grinder kit.


I have another matching claw which I'm thinking of using on the other arm (the melted gun was just a fun experiment lol). The legs are going to be filled out and armor plated. Once that's done I'm going to model a SM backpack and have the wings "tearing" out of the top vents.

Still a lot to work on, but I'm pleased with the results so far.

LoC fire molding

Here are the recent poll results...

What tutorials do you enjoy the most?


Painting Techniques
3 (33%)
Green Stuff/Sculpting
4 (44%)
Model Customization
7 (77%)
Terrain Making
4 (44%)
Other...
1 (11%)

The polls are in with 77% of us preferring to read about Model Customization posts. Green Stuff/Sculpting and Terrain Making are tied at second. I couldn't agree more. I find customized models to be the coolest thing about the hobby.

With that said I'm going to post more model customizing. I just did a lot of kit bashing and can't wait to finish this model. It's turning out really cool :)

Here's a few quick pics of the LoC so far. I decided to stop using GS for the flames and instead am going to try melting plastic instead. I like this method a lot more since it's much faster and you can remodel it instantly if you don't like the shape.


Plague Bearers Conversion pt II

The hot glue adds some nice mass to the model, but it's hard to detail since it doesn't hold any shape. Normally I would just do that and call it good, but it wouldn't make for good reading.

Digging around my electrical tools I had an idea... The soldering Iron! If you haven't used one before they are quite simply a low voltage tool to melt soft metals to create a bonding material for electrical components. For us real men, they are great for burning shit too!

With that said if you decide to use a soldering iron be very careful not to burn yourself. They get extremely hot and can burn you severely. I strongly suggest only plugging it in when you will use it then immediately unplug it when you are done. Speaking from experience I've burned enough things (like carpets) I wish I hadn't haha.


I apologize for the bad pun...


The two prong pitch fork and the torch to the right of it are the same bit. Initially I wasn't trying to make a torch, but these things just happen sometimes, lol.


The box was a little short on swords so I had to improvise a little. The ones above were mostly "bones" from the kit.


After heating up the soldering iron I melted the models carefully. I applied the iron much like a paint brush.


This model has a little work done to the eyes and torso. I decided to, if possible, keep the jaw details and just carve the eye into a cyclops.


Here I was experimenting with adding bullet holes and "battle damage" to the model. The other ones I have claw marks and spilling guts.


Another Plague Bearer.


This sword was a Gene Stealer claw. I wish I had more of these as they were fun to detail.


Nurgle Standard Bearer. I'll probably add something to the standard to make it look more convincing.


Both models here have the same weapon, though the one on the right has had the iron put to it.


They're starting to look a little more Nurglish. The next step will be the hot glue gun to the horns to bulk them out a bit. I'm still debating on if the bodies should get hot glue since it doesn't mold very easily and doesn't hold detailed shapes.